数字图像处理 第 3 周作业 
about 481 words 143 lines of code 4 images reading time 4 minutes
1. 处理思路 
源代码路径:./main.py。
使用 OpenCV 库。读取图片后,先将蒙版图片和背景图片调整形状为与原图片相同。对于蒙版图片,先用一个较大的高斯核进行高斯模糊处理,可能有助于将边缘部分空缺处的灰度值提高,从而增大白色区域。
将蒙版图片二值化,设定阈值为 128,高于 128 认为是白色,设置为 1;低于 128 认为是黑色,设置为 0。然后进行形态学处理:先膨胀后腐蚀,有助于填补缺口、平滑边界部分。膨胀和腐蚀函数可以使用自编版本 dilate(), erode(),提供了源图像、卷积核、迭代次数三个参数,也可以直接使用 cv2 库中内置的函数 cv2.dilate(), cv2.erode()。对于膨胀操作,每一个像素点作为卷积核的中心,卷积核范围内的像素中存在白色像素时,就将这个像素点置为白色。对于腐蚀操作,每一个像素点作为卷积核的中心,卷积核范围内的像素中全部为白色像素时,将这个像素点置为白色。处理过后的蒙版与原图像相乘,得到提取出的人物图片。
替换背景时,只需将提取出的人物图片和背景图片去除蒙版的部分相加即可。
经过测试,卷积核大小设定为 (7, 7),迭代次数分别为 3,3 时效果较好。
2. 运行结果 
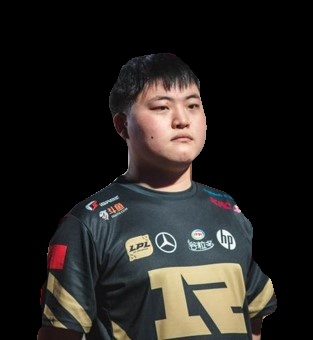
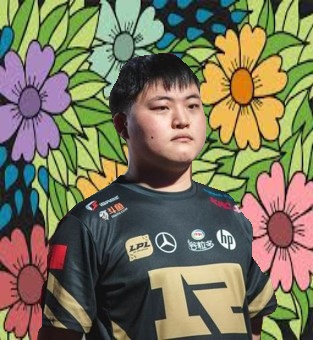
图片 1:处理过后衣服两侧的小凹陷被填补,但是衣服右侧和脖子右侧也多出了额外的背景部分。


图片 2:衣服左侧的两处凹陷能够填补,但是衣服右侧的大片缺失区域难以填补。
3. 源代码 
见 ./main.py :
Python
import cv2
import numpy as np


def dilate(src, kernel, iterations=1):
    """膨胀函数

    Args:
        src (np.ndarray): 二值图像
        kernel (np.ndarray): 卷积核
        iterations (int, optional): 迭代次数

    Returns:
        np.ndarray: 膨胀后的图像
    """
    result = src.copy()
    k_h, k_w = kernel.shape
    pad_h, pad_w = k_h // 2, k_w // 2

    for _ in range(iterations):
        padded = np.pad(
            result, ((pad_h, pad_h), (pad_w, pad_w)), mode="constant", constant_values=0
        )
        temp = np.zeros_like(result)
        h, w = result.shape
        for i in range(h):
            for j in range(w):
                region = padded[i : i + k_h, j : j + k_w]
                if np.any(region[kernel == 1] == 1):
                    temp[i, j] = 1
                else:
                    temp[i, j] = 0
        result = temp.copy()
    return result


def erode(src, kernel, iterations=1):
    """腐蚀函数

    Args:
        src (np.ndarray): 二值图像
        kernel (np.ndarray): 卷积核
        iterations (int, optional): 迭代次数

    Returns:
        np.ndarray: 腐蚀后的图像
    """
    result = src.copy()
    k_h, k_w = kernel.shape
    pad_h, pad_w = k_h // 2, k_w // 2

    for _ in range(iterations):
        padded = np.pad(
            result, ((pad_h, pad_h), (pad_w, pad_w)), mode="constant", constant_values=1
        )
        temp = np.zeros_like(result)
        h, w = result.shape
        for i in range(h):
            for j in range(w):
                region = padded[i : i + k_h, j : j + k_w]
                if np.all(region[kernel == 1] == 1):
                    temp[i, j] = 1
                else:
                    temp[i, j] = 0
        result = temp.copy()
    return result


def main(
    image_path,
    mask_path,
    background_path,
    person_path="./person.jpg",
    new_image_path="./new_image.jpg",
):
    """主函数

    Args:
        image_path (str): 原图像路径
        mask_path (str): 蒙版路径
        background_path (str): 背景图路径
        person_path (str, optional): 保存人物图片路径. Defaults to "./person.jpg".
        new_image_path (str, optional): 保存新图片路径. Defaults to "./new_image.jpg".
    """
    # 读取图片
    image = cv2.imread(image_path)
    mask = cv2.imread(mask_path, cv2.IMREAD_GRAYSCALE)
    background = cv2.imread(background_path)

    print(f"read original image: {image_path}, shape: {image.shape}")
    print(f"read mask: {mask_path}, shape: {mask.shape}")
    print(f"read background: {background_path}, shape: {background.shape}")

    # 调整蒙版和背景图形状
    mask = cv2.resize(mask, (image.shape[1], image.shape[0]))
    mask = cv2.GaussianBlur(mask, (25, 25), 0)
    background = cv2.resize(background, (image.shape[1], image.shape[0]))

    # 二值化蒙版
    binary_mask = (mask > 128).astype(np.uint8)
    kernel = np.ones((7, 7), dtype=np.uint8)

    # 先膨胀,后腐蚀
    dilated_mask = dilate(binary_mask, kernel, iterations=3)
    # dilated_mask = cv2.dilate(binary_mask, kernel, iterations=5)
    # cv2.imshow("dilated_mask", dilated_mask * 255)
    # cv2.waitKey(0)
    # cv2.destroyAllWindows()
    clean_mask = erode(dilated_mask, kernel, iterations=3)
    # clean_mask = cv2.erode(dilated_mask, kernel, iterations=5)
    # cv2.imshow("clean_mask", clean_mask * 255)
    # cv2.waitKey(0)
    # cv2.destroyAllWindows()

    # 蒙版转换为3通道
    clean_mask_3c = np.stack([clean_mask] * 3, axis=-1)

    # 提取人物并替换背景
    person = image * clean_mask_3c
    new_image = person + background * (1 - clean_mask_3c)

    # 保存图片
    cv2.imwrite(person_path, person)
    cv2.imwrite(new_image_path, new_image)
    print(f"save image with only people: {person_path}, shape: {person.shape}")
    print(f"save image with new background: {new_image_path}, shape: {new_image.shape}")


if __name__ == "__main__":
    image_path = "./img1.jpg"
    mask_path = "./mask1.jpg"
    background_path = "./background.jpg"
    person_path = "./person1.jpg"
    new_image_path = "./new_image1.jpg"
    main(image_path, mask_path, background_path, person_path, new_image_path)

    image_path = "./img2.jpg"
    mask_path = "./mask2.jpg"
    background_path = "./background.jpg"
    person_path = "./person2.jpg"
    new_image_path = "./new_image2.jpg"
    main(image_path, mask_path, background_path, person_path, new_image_path)